Makes 48 individual wafers for 24 sandwich cookies
Ingredients
Wafers
- 2 sticks (1 cup) butter, room temperature
- 2 cups all-purpose flour, sifted + extra for work surface
- pinch of sea salt
- ⅓ cup heavy cream
- about 1 cup granulated sugar for work surface & coating wafers
Filling
- 1 stick (½ cup) butter, room temperature
- 1 egg yolk (or 1 tbsp milk)
- 1 tsp vanilla extract
- ¾ cup powdered sugar, sifted
- red & green food coloring
Special Equipment
- stand mixer with paddle attachment
- rolling pin
- 1½" round cookie cutter or shot glass
How-to
Make Dough
-
In a stand mixer with paddle attachment, cream the butter until it gets light and fluffy
-
Add the sifted flour in thirds, a pinch of salt, and alternate flour and heavy cream, ending with flour. Mix until the dough just comes together. Do not over-mix
-
Remove from mixer, shape into a disk, wrap in plastic wrap and refrigerate for 30 minutes
Shape Wafers & Bake
-
Preheat oven to 350º
-
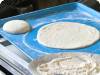
Dust work surface with flour and sugar
-
It works best to roll only half of the dough at a time. Keep the rest refrigerated until ready to use
-
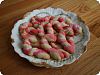
Roll dough to ¼" thickness. Dip 1½" round cookie cutter (Grandma used a shot glass!) into sugar and cut wafers. (You should get 48 wafers, to make 24 sandwiched cookies)
-
Coat both sides of each cookie with granulated sugar. Place on ungreased cookie sheet and make 3 fork pricks in each cookie
-
Bake for about 7-8 minutes on the middle oven rack or until wafers are cooked all the way through, but not browned. There's a fine line between when the wafer is not cooked to when it gets overdone
-
Remove wafers from the oven and place on a cooling rack. Cool completely before filling
Make Filling & Assemble
-
In a stand mixer with paddle attachment, cream the butter until light and fluffy
-
Mix in 1 egg yolk (or 1 tbsp milk), vanilla extract and powdered sugar (add more powdered sugar if consistency is too thin) and mix just to blend ingredients. Scrape down the sides of the bowl and give a final quick mix
-
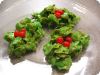
Divide filling into 2 separate bowls; mix in a few drops of red food coloring in one bowl, and a few drops of green food coloring in the other
-
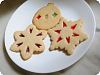
Spread filling (about 1 tsp) between 2 wafers, assuring that the fork marks are on the outside of the wafers
-
Keep wafers refrigerated until serving. They will keep for 1 week refrigerated in an air-tight container