


Entrees » Crispy Chewy Pizza Dough
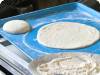
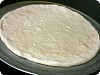
Everyone should know how to make pizza dough. Just clear off the counter and be prepared to have fun and get flour everywhere. This recipe is designed to give you a crunchy outside and a chewy inside.


Comments (16)
-
 Posted Thursday, April 18, 2019, at 2:51 am by Bangalore Escorts:Angels of Bangalore https://www.angelsofbangalore.com/
 -
Posted Tuesday, September 4, 2018, at 1:56 am by Janet:I just put the sugar and oil in it with the water. It turned out to be the best pizza crust recipe I have found thus far.
-
Posted Sunday, September 2, 2018, at 2:40 pm by Janet:Sounds great. I still don’t see when you put the sugar and oil in.
-
Posted Monday, March 14, 2011, at 8:16 pm by meagan:Help! I have scratching my head about this recipe all day. Neither the video NOR the instructions mention the sugar or oil. And I see the previous comments about the water to flour ratio but I am still totally confused. Can someone help me out? I made the dough exactly how is is written except I didn't add any more flour and actually added some water. It tasted so good, but I want to have it more chewy and less dry.
-
Posted Friday, June 4, 2010, at 8:37 pm by how2heroes:hi preet27. all-purpose flour works great. nothing special needed. don't need to add what gluten or use bread improver. just follow what chris does in the video and his recipe which you can find in the Get recipe tab above. This crust is amazing(!) but we also have another excellent pizza dough video if you want to evaluate which you like better: http://how2heroes.com/videos/techniques/easy-pizza-dough
-
Posted Thursday, June 3, 2010, at 7:54 pm by Preet:Okay what kind of flour is being used here, all purpose flour, bread flour, bakery flour, also does the recipe involve adding wheat gluten or for that matter use of bread improver, reply Thanks !!
-
Posted Sunday, May 16, 2010, at 4:39 pm by Pete:Update to my comment below ==> This works as shown in the video if you use ALL water in the beginning - everything else follow what they say (75% flour initially; then the rest 20 minutes later). It also makes the best dough doing it this way instead of other ways - I tried several. If you want to try it, much less yeast works well, too, with all else the same. 1/4 teaspoon is really all you need.
-
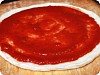
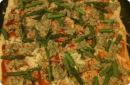 Posted Monday, March 15, 2010, at 5:48 pm by Lynne:here's the second pizza i made with this dough. i had frozen this half of the batch and thawed it out yesterday. the topping is a tiny bit of red sauce, grated fontina, topped with chopped asparagus and mushroom pate (the mushroom pate recipe is on this site and it's amazing). the fresh pizza dough is definitely a bit more airy and crunchy but in a pinch it's nice to have some in the freezer ready to go. yum!
 -
Posted Thursday, March 11, 2010, at 11:33 pm by Lynne:i made this pizza dough and i LOVED IT!! crispy, airy. i felt like i was back in new york city. the video is very clear as to what you need to do and i had to add more flour but he specifically tells you to add enough flour until the dough pulls away from the sides of the bowl and the dough no longer sticks to your hands. that's when you know it is ready for resting. so i totally followed his direction and voila. perfect, crunchy & awesomely delicious pizza crust. freezes well too.
-
Posted Saturday, February 27, 2010, at 10:07 pm by giorgio:Just had to comment on this recipe as I'm making it right now. This seems to be another example (of which there are many) of a recipe with the wrong amounts of ingredients. Approximately 1 cup of flour too much. When using the initial 3/4 cups of water you only would use 1 /34 cups of flour to get the proper consistency. After the intial 2 minute mix to create the "biga" you will only be able to use approximately 1/4 to 1/3 cup of the remaining flour to get the proper consistency this "cook' refers to in his video. Thanks for taking the time to publish your recipe, but more attention should be paid to the amounts recommended. Hopefully the crust will turn out after these corrections. I'll keep you posted for those of you that wish to know the outcome/final results.
-
Posted Monday, February 15, 2010, at 2:26 pm by Pete:Great recipe guys! Thanks so much! One thing I don't understand, though.. In Step 1, when I add 3/4 cup water and 2 1/4 cups flour, as the recipe states, I get an extremely dry mixture and not even close to the wet mixture in the video. The printed recipe says to save another 3/4 cup water for Step 3, but I have to add 1/2-3/4 cup water while still in Step 1 to get it even close to the consistency of Chris's "pre-dough" in the video. After 20 minutes, when I add the remaining 3/4 cup flour, it turns out great without much, if any, additional water. So my question is: How does Chris get a wet mixture in Step 1 with 2 1/4 cups flour and only 3/4 cup water? What am I missing? My dough has been turning out well but I'm thinking maybe it can be better if I get the recipe done more correctly. Thanks!
-
Posted Sunday, October 4, 2009, at 3:31 am by how2heroes:Hi, Mickster & thanks for your question. Please click on "View Recipe" at the top right of the video to get Chris' great recipe where he lists, "Let proof (sit) for a minimum of 4 hrs. (Chris proofs his dough for 24 hrs in the refrigerator)."
-
Posted Saturday, October 3, 2009, at 3:53 pm by mick:where do you do the 24hr proofing? In the fridge?
-
Posted Friday, January 16, 2009, at 12:27 am by how2heroes:thanks so much, gino. the recipe has been fixed thanks to you!
-
Posted Saturday, January 10, 2009, at 7:07 am by Gino:Very helpful video. Especially Section 3 and Section 4. Forming ball and stretching dough.The video recipe did not include 1 tsp sugar, 1 1/2 cups water and 1/4 cup oil which were included in the View Recipe section which is the recipe I followed. It was way to wet so I kept adding flour. I ended up with 4 x 225 gr balls which were formed beautifully thanks to this video. I'll try the video recipe next time.
-
Posted Thursday, October 23, 2008, at 3:03 am by heliman:I have a woodfired pizza oven at home and have been experimenting for a few years but never managed to get a "perfect" crust.... until now that is. Chris' recipe is absolutely fantastic, easy to follow and produces incredible pizzas. The pizza sauce video is excellent too as is Chris's other video on pizza making tips. Thanks for sharing this great recipe Chris - much appreciated!
Add a Comment / Rate this Video
You must be logged in to comment!