Guaranteed Pumpkin Pie
Ingredients
Pumpkin Filling
- 2 cups (15-oz can) pumpkin
- ½ cup brown sugar
- ½ cup granulated sugar
- ½ tsp salt
- 1 tbsp unbleached all-purpose flour
- 1 tsp ginger
- 1 tsp cinnamon
- ½ tsp nutmeg
- ¼ tsp allspice
- ⅛ tsp freshly ground black pepper
- 3 large eggs
- 1¼ cups evaporated milk (light cream or whole milk)
Crust - use a store-bought pie shell or this recipe for 2 single-crust shells [freeze one for later use]
- 3 cups (12.75 oz) all-purpose flour
- 1½ tsp salt
- 8 tbsp chilled shortening
- 1 stick chilled butter
- ½ - ¾ cup (4-6 oz) ice water
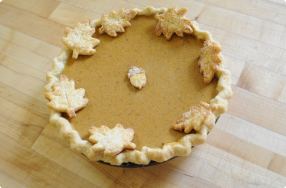
Pie Crust Decorations (optional)
- leftover chilled pie dough
- 1 egg + small amount of water for egg wash
- sparking sugar
Special Equipment
- rolling pin
- 9" x 1½" pie pan
- baking sheet
- parchment paper
- cooling rack
- cookie cutters (if making Pie Crust Decorations)
How-to
Make Filling
- In a large mixing bowl, mix together the pumpkin, sugars, salt, spices and eggs with a spatula
- Add evaporated milk and mix to incorporate all ingredients. (For best flavor, cover and refrigerate filling overnight; filling can also be frozen, well sealed, for up to 2 months)
Make Crust
A store-bought pie shell will work fine for this pie filling, but to make your own crust, follow Susan Reid's instructions below. The pie shell can be made up to 1 month ahead of time and frozen (well-wrapped!); then thawed but kept chilled until ready to use
- In a large bowl, combine the flour and salt. Cut or rub in half of the shortening/butter, then the other half, leaving some pieces as large as your thumbnail
- Sprinkle ice water, 1 tbsp at a time, over the mixture. With a fork, toss the mixture together. Continue until the dough is just moist enough to hold together when pressed. (If you're making a 2-crust pie, gather a little more than half of the dough and pat it into a disk; wrap in plastic and chill for 1 hour (the larger portion will be the bottom crust.) Do the same with the remaining dough for the top crust. If you're making two 1-crust pies, divide the dough evenly, wrap and chill before rolling; for this pumpkin pie, 1 pie shell is used)
- Roll crust until it is about ⅛" thick and about 2" larger than the diameter of the pie plate. This gives you enough to make a good high rim (single crust shell) or to match with the upper crust (double crust bottom). If you turn your pie plate upside down on the dough, you will be able to figure out just about how big to roll it. Keep chilled until ready to use
Roll Dough, Add Filling & Bake
- Lightly grease a 9" pie pan that's at least 1½" deep. Roll pie dough out to a 13" circle, and transfer to the pan. Crimp the edges above the rim; this will give you a little extra headroom to hold the filling when it expands in the oven. Refrigerate the crust while the oven preheats to 425º
- When the oven is hot, place the pie pan on a parchment-paper lined baking sheet to catch any drips. Pour the filling into the unbaked pie shell
- Bake at 425º for 15 minutes. Reduce heat to 350º and finish baking for 30-35 minutes. Check at the half-hour point to be sure edges are not cooking too quickly. The center should still be wobbly. Remove pie from the oven and cool on a rack; the center will finish cooking through as the pie sits
Make Pie Crust Decorations
- Preheat oven to 425º (adjust higher or lower if you just baked a pie)
- Roll chilled dough to ¼" - ⅛" thick
- Cut shapes and score lightly with a knife
- Brush with egg wash and sprinkle with sparkling sugar
- Bake for 10-15 minutes, until golden brown
- Add to 1-crust pie as decoration or cover filling completely as top crust
Tips from King Arthur Flour Bakers
- People get nervous about pie crust, and in their anxiety they tend to work the dough too much. Cutting the butter in too far makes a mealy crust. Kneading it too much and/or adding too much water toughens the dough, making it more difficult to roll out
- Resting the dough in the refrigerator both after mixing and rolling out, will dramatically increase the quality of your results. This "time out" allows the gluten in the dough to relax (making the crust more tender), and firms up the fats in the dough (helping it stay flakier)